Shibari Tutorial: Master Japanese Rope Bondage Techniques
https://qlgzlirahrsgkcfxevmw.supabase.co/storage/v1/object/public/website-images//x%20Kazari%20Musubi%201%202.webp
Introduction to Shibari and Kinbaku
Shibari, in the simplest terms, means “to tie” in Japanese – but it is so much more than just tying knots. Also known as Kinbaku (which translates to “tight binding”), Shibari is the artful practice of Japanese rope bondage that intertwines restraint with deep intimacy. It elegantly combines historical techniques with modern erotic expression, evolving from old samurai prisoner ties into a profound form of visual and sensual art. Often misrepresented as merely a taboo kink, Shibari actually centers on connection: the dance of trust, vulnerability, and power exchange between those who tie and those being tied. In Shibari, ropes become an extension of the hands – a silent language expressing care, control, and surrender all at once.
What is Shibari? History and Culture
Shibari’s roots trace back to Japan, where in the feudal era ropes were used in hojojutsu, a martial art of restraining captives (since rope was plentiful and iron for shackles was scarce). These techniques later morphed into erotic bondage in the late 19th and early 20th centuries, giving birth to what came to be called Kinbaku-bi – “the beauty of tight binding”. Modern Shibari as an underground BDSM art truly blossomed in post-WWII Japan, appearing in erotic magazines like Kitan Club in the 1950s–70s and secret BDSM clubs. (Despite the frequent marketing of Shibari as an “ancient art,” it’s actually a relatively modern practice in its erotic form.)
In Japanese, “Shibari” can refer generally to any tying, whereas “Kinbaku” more explicitly denotes erotic rope bondage. Today, even in Japan, Shibari remains somewhat taboo and practiced privately or in niche communities. Yet globally it has gained admiration as a form of erotic art. Traditional Shibari draws on Japanese aesthetics – think of wabi-sabi, finding beauty in imperfection, and the contrast of rough rope against bare skin. “The beauty lies in juxtaposition: bare skin against rough rope, strength against exposure, a sense of calm against the knife-edge of risk,” as one artist described. Shibari is often performed with natural-fiber ropes (jute or hemp) that lend a natural, warm look and a bit of authenticity from Japanese culture.
Japanese Rope Bondage vs Western Styles

How does Japanese Shibari differ from Western rope bondage? The contrasts are fascinating. Eastern (Japanese) rope bondage developed with a strong emphasis on aesthetics, ritual, and unspoken communication. It’s often tied to concepts of Zen-like mindfulness – the act of tying can feel meditative – and an almost spiritual focus on trust and surrender. In a traditional Shibari scene, a Japanese rigger might rely on implicit understanding and nonverbal cues, embracing a flow of energy between partners. The rope patterns tend to be intricate and symmetrical, accentuating the body’s form in artistic ways. Even the mindset can be different: Shibari performers sometimes speak of reaching a state of “flow” through tying, where rope and bodies move in harmony, almost like a slow dance.
In contrast, Western bondage styles historically were more utilitarian – think leather cuffs, handcuffs, or basic rope ties for restraint without the decorative flourishes. Western BDSM communities have eagerly adopted Shibari techniques in recent decades, but often with a twist. There is usually a heavier emphasis on explicit consent dialogue and safety negotiation up front (not that these aren’t present in Japanese Shibari – they absolutely are, but Western teachers tend to spell it all out). Western riggers often blend rope with other influences, like incorporating shibari ties into performance art, photography, or fusion with dance and circus arts. Culturally, Western rope play may prioritize individual creativity over strict tradition – new knots, synthetic ropes, neon colors, mixing rope with harnesses or chains – whereas Japanese Shibari holds reverence for certain classic forms (such as the takate-kote chest harness). Another difference is materials: in Japan, jute rope is king (light, a bit rough, but holds knots beautifully), whereas Western rope enthusiasts might use hemp, cotton, or even nylon depending on preference. The end result is that Japanese Shibari often looks like an art installation on the human body, while Western rope bondage might be less visually complex but equally focused on the experience – whether that’s erotic restraint, power exchange, or even therapeutic sensation. Both styles value intimacy, trust, and creativity, but the cultural flavors differ like two dialects of the same language.
Why Learn Shibari Techniques
Why learn Shibari? The motives can be as simple as spicing up your love life or as profound as exploring trust and communication in a relationship. Shibari is sex-positive and expressive – it invites you to tap into fantasies in a consensual, creative way. For couples (or any partners), practicing rope bondage can forge deep bonds between partners, because it inherently requires trust and continuous communication. There is a beautiful irony: by binding your partner, you may both feel freer in your emotional expression. The rope becomes a conduit for emotions – each wrap can say “I’ve got you, you’re safe” or “I control you, let go.”
Many find Shibari offers a form of mindful escape and stress relief. The focus required to tie (or be tied) in intricate ways effectively clears the mind. As one study noted, participants described rope sessions as “a retreat from the daily grind,” a chance to “unbind the stress of everyday life” and be intensely present in the moment. For the person being tied (often called the rope bottom or model), Shibari can lead to a deep meditative state or natural high sometimes nicknamed “rope space.” The sensations of rope pressing on skin, the inability to move freely, and the rhythmic flow of tying can induce a rush of endorphins and a floaty feeling of surrender. You might “let go emotionally and physically”, enjoying how the rope’s tight embrace heightens your body’s sensations. Some bottoms even report enhanced sensual perception or more intense orgasms when tied, as the bondage creates a buildup of erotic tension.
For the person tying (the rope top or rigger), learning Shibari can be equally rewarding. You get to practice craftsmanship in your knots and patterns, almost like learning an art form. There’s pride and pleasure in creating something beautiful on your partner’s body. As famed educator Midori notes, the rope-caster might delight in “their partner being able to let go and experience pleasure,” finding it exhilarating and emotionally connecting to be the guide through that journey. Shibari also offers practical benefits in the bedroom – it’s a great way to create sexy positions or restraints that hands alone can’t achieve. A simple harness can support legs or arms in place, making certain sexual positions easier to hold (imagine ankles bound to thighs in a futomomo tie – it keeps the legs bent open effortlessly).
Beyond the playfulness and eroticism, there’s a rich relationship aspect to rope. Tying someone up requires negotiation, trust, and care – all hallmarks of healthy intimacy. You and your partner will learn to communicate clearly about comfort, limits, and desires. This builds not only sexual chemistry but also deepens your understanding of each other. Many couples find that rope scenes bring them closer emotionally; it’s a vulnerable adventure you navigate together. And it’s fun! There’s a sense of accomplishment in learning knots and then creatively applying them. You might start for the thrill and sexy fun of it, but stay for the profound connection and personal growth Shibari can foster. As one research participant observed, “Being part of Shibari sessions has introduced me to open-minded, accepting people, making me feel part of something larger than myself.” In other words, you might even gain a welcoming community along the way – a network of others who appreciate this unique blend of art and intimacy.
Whether you’re drawn by the artistic beauty, the erotic charge, or the bonding experience, learning Shibari techniques can enrich your play and your partnership. It’s an adventure in sensation and communication. Now, let’s get down to the nitty-gritty: the ropes and knots themselves!
Essential Shibari Knots and Ties
Before we dive in, remember: Safety first. Have a good pair of safety shears nearby whenever you practice ties (in case you need to cut someone free quickly). Make sure you can fit a couple of fingers under any bound rope – circulation is key. Check in often with your partner (if they can’t speak, establish a safe signal). Now, onto the foundational ties every rope lover should know. These are the ABCs of Shibari – once you master them, you can create all sorts of fun bondage designs.
Single Column Tie Step-by-Step
The single column tie is the most fundamental knot in Shibari – if you learn one thing today, make it this. A “column” just means anything rope can wrap around (a wrist, an ankle, a thigh, a bedpost, etc.). A single column tie secures one such object. This tie is designed not to cinch tighter on the limb when pulled, making it safe for bondage. It’s the building block for almost everything else, from basic handcuffs to elaborate harnesses.
Here’s how to tie a basic single column tie (try it on your own wrist or a friend's – or even a table leg – as you follow along):
-
Find the rope midpoint: Take your piece of rope (for practice, ~10 feet is plenty) and fold it in half to find the bight (the middle loop). Place that bight on the outside of the limb you’re tying. For example, if tying a wrist, you’d lay the bight against the outside of the wrist. Wrap the rope around the wrist twice side by side, so you have two neat parallel loops encircling the wrist. Don’t make it too tight – you should be able to slip a couple of fingers between the rope and skin for safety.
-
Cross and tuck the bight: Now take that bight (the loop) and cross it over the two wrapped strands of rope. Think of making an “X” shape on top. Then poke the bight underneath everything – under both wraps – and out the other side. (It’s like you’re threading the loop under the wraps you made.)
-
Create the knot: With the bight now pulled out under the wraps, you’ll form the locking knot. Take the free working ends of your rope (the two loose ends) and feed them through the bight loop you pulled under, creating a new loop. Now pull the working ends through that loop over to the opposite side. If you do this correctly, when you pull, you’ll see a knot starting to form that cinches the rope around itself, not around the wrist. (If you accidentally did it from the wrong side, the whole thing might fall apart – just try threading the opposite way through the loop.)
-
Lock it off: To secure, make one more loop and feed the ends through again (essentially tying a second overhand knot on top of the first) and pull tight. The final knot should look tidy and should not tighten down on the limb when you pull the rope – all the tension locks onto the knot you made, not the wrist. Double-check you can still fit two fingers under the wraps for circulation.
-
Position the knot smartly: Slide the knot (and that little leftover loop of bight) so that it sits on the outside of the limb, away from the inner wrist or any pressure points. For a wrist tie, you’d want the knot on the back of the hand or outer forearm side, not pressing into the soft inner wrist where nerves run. This ensures maximum comfort and safety.
And that’s it – you’ve tied a single column tie! Pro tips: Make sure your two wraps lay flat and don’t cross over each other (no twisted ropes) to distribute pressure evenly. Leaving a little extra loop (the bight) after the knot is fine – in fact, beginners should err on the side of a larger loop rather than tying it down to a tiny nub; a bit of leftover bight helps ensure the knot won’t work itself loose. With practice, you can make it neat and snug. This knot is often called a “non-collapsing cuff” – it acts like a gentle cuff on the wrist/ankle that won’t tighten further. You can now tie one column; time to move on to two!
Double Column Tie Tutorial
A double column tie is simply a method to tie two things together – for example, tying someone’s wrists to each other, or binding ankles together, or wrist-to-ankle (for a hogtie), and so on. It builds on the single column tie you just learned. Essentially, you’ll tie two limbs as one “column” and add a cinching wrap between them so they stay nicely secured. There are a few ways to do double-column ties; I’ll show you a common Shibari-style method that doesn’t collapse.
Example: Let’s tie two wrists together in front of the body (imagine gentle handcuffs made of rope).
-
Start just like the single column: find the rope’s midpoint (bight) and wrap it around both wrists together, keeping the wrists parallel about an inch or two apart. Wrap twice around both wrists, forming two neat bands. This time, leave a bit more slack in your bight loop than you did for a single wrist – you’ll need extra room to complete the knot. Ensure you’re wrapping above the wrist bones (closer to mid-forearm) for comfort, and as always leave a little finger-room under the wraps.
-
Cross and cinch: Take your bight and cross it over the top of the wraps. Now, here’s the difference from the single column tie – we’re going to cinch the two wrists. Pass the bight between the two wrists (i.e., in the gap between the “columns”) and then wrap it around the entire bundle of ropes, coming out on the other side. This creates a winding that goes around the parallel wraps and between the limbs, tightening them together. Essentially, the bight goes over the top, down between the wrists, behind the ropes at the bottom, and back up between the wrists on the other side (forming a figure-eight around the two “columns”). Pull the bight through until you have a snug cinch binding the two wraps together.
-
Tie the knot: With the wrists now cinched, you finish exactly like the single column tie. Create a loop with the working ends and feed the bight through this loop, then pull – if it “just falls apart,” try threading from the opposite side. Usually, bringing the bight through from underneath the cinch is the trick. Then make a second loop and feed the bight through again, pulling tight to lock the knot securely.
-
Adjust and check: The resulting knot (often looking like a little stack of wraps with the bight loop at the end) should lock the ropes in place without cinching the wrists themselves. Check that you can slip fingers under the ropes on each wrist – they should be snug but not cutting off circulation. Also ensure it's not so loose that one hand could slide free. You can slide the knot to rest between the wrists or on the outside – avoid placing it right on the inner wrists. If tied correctly, the wrists will be comfortably bound side by side, and the knot will hold everything firm.
Great job! You now have a sturdy double column tie. Quick test: try gently pulling the wrists apart – the ropes should tighten against each other but not cinch tighter on the wrists. This tie is basically like rope handcuffs.
Remember, practice makes perfect. “Practice, practice, practice!” as one tutorial put it – repeat your single and double column ties until you can do them in your sleep. Once these foundations are second nature, you’ll be ready for more elaborate ties. Most advanced Shibari forms (like harnesses and lattice-like patterns) start with one or two column ties as anchoring points. So, think of these as your alphabet – soon we’ll spell some words with them!
Two Column Tie Variations
A double column tie can be applied in endless ways, and it’s worthwhile to know a few variations and uses. The basic method above is one of the most common. But what if you want to tie, say, someone’s ankles together? Or tie their wrist to their thigh (imagine an arm frogtied to the leg)? The good news is the same principles apply.
You can use a double column tie to connect any two “columns” of roughly similar size: ankle-to-ankle, wrist-to-wrist, wrist-to-ankle, arm-to-arm, calf-to-thigh, you name it. For instance, to tie an ankle to a thigh (a classic frogtie position), you’d bend the leg so the heel is near the butt, then treat the ankle and upper thigh as your two columns – wrap around both, cinch between ankle and thigh, and lock the knot. Voilà – the leg is secured in a folded position. If tying two limbs of different sizes (say a wrist to a thigh), you might wrap more around the smaller limb so the wraps on each “column” are even before cinching.
There are also alternate techniques for double column ties. Some riggers prefer a simple “cuff tie” using a square knot: wrapping both columns a few times and then just tying an overhand or square knot to cinch – this is quick, but be cautious as it can tighten on the limbs if pulled hard. The method we did (using the bight and looping through) is often called a “Two-column cuff” or X-friction tie, which tends to be safer under tension.
Feel free to experiment with slight adjustments. For example, you can add an extra wrap or two for more support (e.g., do four wraps around the wrists instead of two for a wider cuff). You can also change where you cinch – sometimes a double column tie can be cinched in two places instead of one for stability. There are “Texas handcuffs” which are basically two double-column ties stacked to make a broader restraint, or “ladder ties” that connect two columns at multiple points (like lashing thighs together at knee and ankle). These are just fancy iterations once you grasp the core idea: two things tied side by side with a cinch between.
Also consider what you tie the columns to: One column could be a body part and the other could be a fixed object. For example, tie a wrist (column 1) to a bedpost (column 2) using a double column tie – instant bondage to furniture! Or tie someone’s ankles together and then use the rope’s tail to tie the ankles down to something (or up to a hook – but that ventures into suspension territory, which we’ll get to later). Double column ties are super versatile. They are the gateway to many classic bondage positions: hogties (wrists tied to ankles behind the back), boxties (arms tied together), pretzel ties (wrists to opposite ankles, creating a twist), etc. Once you have this skill, you can get delightfully creative.
To sum up: the variations are mostly about where you apply the tie and minor stylistic differences in the knot. But the underlying concept remains: two columns, parallel wraps, and a cinch. With the single and double column ties under your belt, you’re ready to explore some beautiful Shibari positions and patterns next.
Shibari Positions and Patterns
Now comes the fun part – using those knots and ties to create beautiful bondage forms all over the body. Shibari isn’t just about tying wrists and ankles (though that can be fun too); it’s famous for elaborate harnesses and patterns that turn the human body into a work of art. In this section, we’ll go over some popular Shibari positions and decorative ties. These range from functional – like harnesses that actually restrain movement – to purely aesthetic, where rope is applied in intricate designs for the look and sensation rather than strict restraint.
Chest Harness Bondage Guide
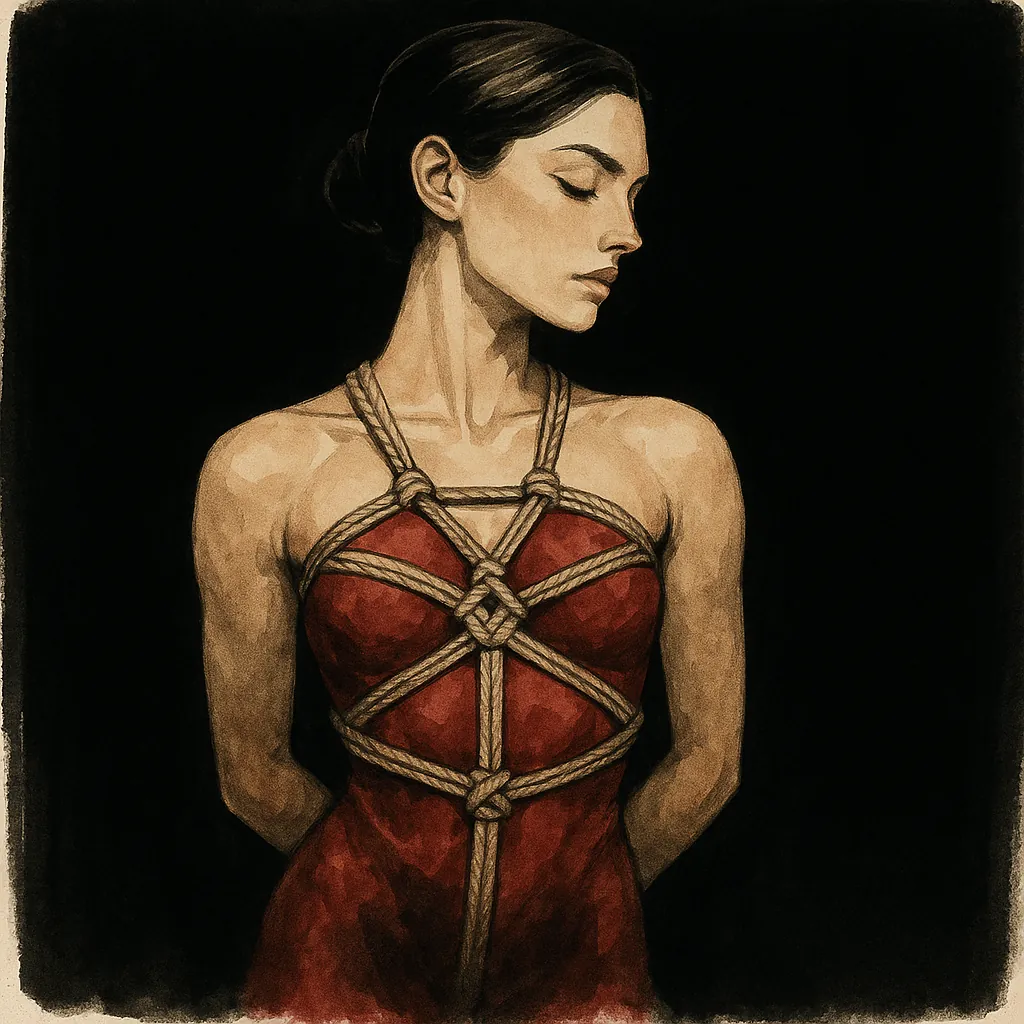
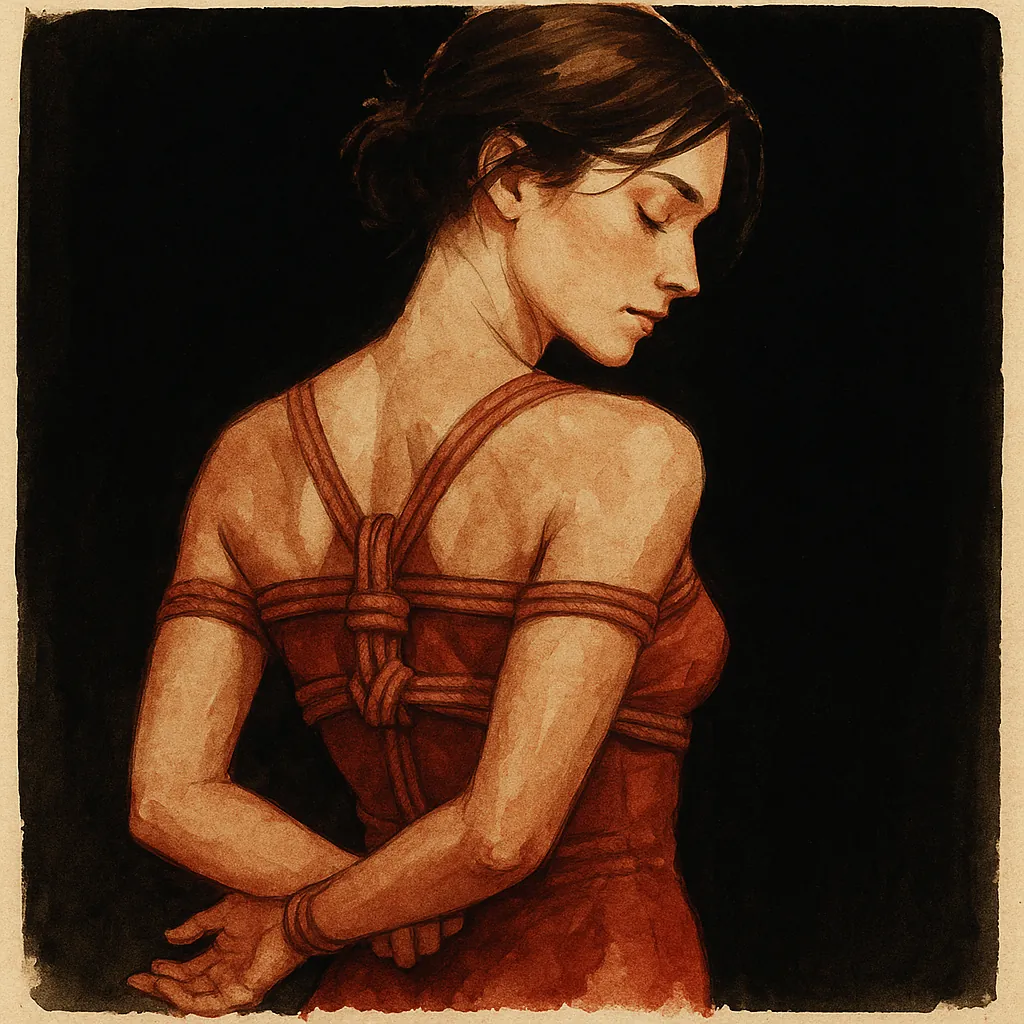
One of the quintessential Shibari ties is the chest harness. In rope lingo you might hear terms like “upper-body harness,” “shinju” (breast harness), or the famous “takate-kote” (TK, box tie). There are many styles, but they all involve wrapping rope around the torso and chest. A chest harness can stand alone as a beautiful bondage piece or serve as a foundation to attach other ties (for instance, you can connect arms or a crotch rope to a solid chest harness). It can be anything from a simple decorative binding around the boobs to an intricate cage of rope that also locks the arms in place.
For beginners, we’ll start with a straightforward two-band chest harness that doesn’t involve tying the arms (making it safer and easier). This basic harness goes around the chest and back, above and below the breasts, creating a sort of rope bra. It looks great on any body – regardless of gender, by the way; any chest can wear a harness.
How to tie a simple chest harness:
-
First wrap (below chest): Take a long rope (30 feet is good here). Find the middle and place the bight centered on your partner’s back, roughly at the spine between the shoulder blades. From that midpoint, wrap the rope around the torso, bringing both ends around to the front under the breasts/pecs (or across the chest for male-bodied folks). The rope should form a horizontal band encircling the chest. Back at the spine, feed the two ends through the bight loop to lock that band in place in the center of the back. This creates a “stem” (the doubled rope at the spine) and ensures the wrap won’t slide down. The band should be snug but not so tight it restricts breathing – your bottom should be able to take a deep breath comfortably.
-
Second wrap (above chest): Next, take the rope ends and reverse direction, bringing them around the body again but this time above the breasts (across the upper chest, just under the armpits). It helps to switch the direction of wrap when you come around the back so that the rope stays tight – if you went clockwise around the first time, go counter-clockwise now, so the second wrap doesn’t loosen the first. When you get back to the center of the back, tuck the ends under the vertical stem (the section of rope running along the spine) to anchor this upper wrap. Then reverse direction once more to go back around to the front. Essentially, you now have two horizontal bands: one below the chest, one above. At the center back you have a figure-eight sort of twist connecting them via the stem.
-
Join in front (between breasts): Now we’ll make it a harness by linking those two bands in front. Take the two rope ends, which should now be at the back after securing the second wrap. Bring them over one shoulder (say, the right shoulder) to the front of the body. The ropes will come diagonally across the chest. Guide them between the breasts (or pecs), then under the bottom chest band in front, and up over the top chest band – effectively weaving the vertical rope between the two horizontal wraps in front. Pinch the bottom wrap together as you do this so it stays flat and doesn’t twist. What you’ve done is create a little knot or cinch between the breasts. Pull the ropes through and back up towards the shoulder, tightening that cinch. This not only decorates the front but also prevents the bands from separating or sliding.
-
Shoulder and back finish: Now take those working ends and drape them over the opposite shoulder (if you went over the right shoulder before, cross over the chest and go over the left shoulder now) and let them fall behind the back. You’ll now secure everything at the back. At the center of the back, you can tie a half-hitch knot around the vertical stem or one of the horizontal bands to lock the harness. For example, make a loop with the rope ends, bring them around the stem (the vertical from earlier) and back through the loop to form a half hitch, then tighten. This creates a neat knot on the spinal column of the harness. With any extra rope, you can get creative: wrap the remaining rope around the stem in a decorative way, or even weave it up and over the shoulder straps in a criss-cross. Finally, tie off the rope securely (an overhand knot on the stem works, or another half hitch) and tuck the ends safely.
Congratulations, you've made a basic chest harness! It should look like two bands framing the chest with a nice symmetric pattern and a supportive feel. This harness is sometimes called a “shinju” which means “pearls” – hinting at how it frames the breasts like a strand of rope pearls. It’s comfortable for most – people often describe chest harnesses as “hugging” them; they provide a secure, embraced feeling that many find calming and sensual. Rope harnesses on the chest also highlight the body’s natural curves, celebrating shapes in a way that’s both sexy and confidence-boosting. (Fun fact: Some even wear decorative chest harnesses over clothing at festivals or parties as a bold fashion statement – rope harnesses can look like exotic accessories!)
Safety note: Chest harnesses should not be so tight that they impair breathing. Always check in about comfort – your partner should be able to inhale deeply without pain. Also be mindful of rope positioning near the armpits; avoid pinching the sensitive nerves that run along the inner arms. If your bottom feels tingling or numbness in their arms, loosen up immediately.
Now, what about that famous Shibari chest tie – the Takate Kote (TK)? That’s the box-tie where the bottom’s arms are pulled behind their back in a specific folded position and tied as part of the chest harness. It’s an iconic Kinbaku tie and often the basis for suspension. However, I don’t recommend new folks try a TK without proper training – it’s a more advanced harness because it carries risk of nerve injury in the arms if done incorrectly. The harness we just did keeps arms free, which is much safer for learning. Still, it’s good to know of the TK: it involves two ropes making a harness around the chest and shoulders while the wrists are tied behind the back and incorporated. If you continue in Shibari, you’ll likely learn it from a skilled teacher. For now, our simple chest harness gives you plenty to play with (you can always lightly tie wrists together behind or in front of the person to accompany it, using your double column tie).
Rope Body Harness Tutorial
Moving on from just the chest, we can expand rope to the whole torso with a full body harness. One classic is the Hishi Karada, often just called a rope body harness or rope “dress.” Karada means “body” in Japanese, and this tie creates a network of diamond-shaped patterns (hishi = diamond) running down the body. It’s aesthetically stunning – imagine a net of diamonds holding the body – and it feels like a full-body hug. The karada doesn’t strongly restrict movement (arms and legs are usually free), so it’s often done for the sensation and look. It’s also a great anchor – you can attach other ropes to it easily for more bondage. And yes, it can be worn under clothing for a spicy secret (picture going out to dinner with rope under your outfit – a naughty little secret between you two!). The Hishi Karada is sometimes called the “rope dress” because it decoratively wraps the torso from shoulders to hips.
How to tie a basic diamond Karada:
-
Prepare: You’ll need a longer rope, about 25-30 feet (8-10m). Find the rope’s midpoint. Have your partner stand (or you can do it lying down, but standing is easier).
-
Neck loop: Place the midpoint of the rope at the back of the neck, bringing the two rope ends straight down in front on either side of the neck, essentially like a necklace or halter. Cross the two rope ends over each other in front of the chest once or twice to form the first diamond shape (imagine an X between the breasts). For a classic karada, you twist the ropes around each other three times at the center of the chest, which will create three diamond openings running down the front.
-
Weave down the torso: After making those front twists, take the rope ends between your partner’s legs (one rope on each side of the groin) and then bring them up the back side. This will create a loop that goes between the legs – a kind of gentle crotch rope, which can be quite stimulating for the wearer. Now, from the back at the waist, bring the ropes around to the front on either side of the body and thread each end through the bottom-most front diamond (the lowest twist you made). Essentially, you are weaving the ropes through the center twists to start forming the diamond lattice. Don’t pull these too tight yet; allow some slack so diamonds can form.
-
Continue weaving upward: Repeat the process: after threading through the lowest diamond, take the ropes around behind the body again, then forward through the next diamond up. Do this for each twist/diamond you created in step 2. Each time you pass the ropes through a front loop and around the body, it cinches that section and creates the distinctive diamond shape. By the time you reach the top diamond (near the chest), the rope ends will be coming out near the top of the torso.
-
Shoulders and finish: There are a few ways to finish a karada. One simple way: once you’ve threaded through the top diamond, bring the ropes up over the shoulders from front to back (if not already there) and then down behind the back. You can now tie the rope off along the “spine” of the harness. Typically, you’d tie the ends off around the center junction at the back or around one of the horizontal passes at the back. You might also wrap the excess rope around parts of the harness to decorate or tighten it. The goal is to secure the rope so it doesn’t loosen. Tuck any loose ends. When done, the karada harness should have a neat series of diamond patterns centered on the torso, front and back, with a cinch running through the middle of them. The rope should be snug but comfortable – like a form-fitting net. It should not be so tight as to pinch skin or restrict breathing or hip movement. Adjust the diamonds so they are symmetric and lying flat.
Now your partner is wearing a full rope body harness! This tie is as much about form as function. The sensation of a karada is often described as stimulating but comforting. The rope crossing everywhere provides many points of pressure (which can become erogenous zones as the scene progresses). The diamonds frame the curves of the body in an enticing way – many rope models adore how a karada accentuates their waist and hips, and it can boost body confidence. A karada also makes a handy “handle” – a rigger can slip fingers under a chest or hip diamond to pull their partner in for a kiss, for instance. It’s also a great anchor for further bondage: you could tie wrists to the sides of the karada, or attach a leash to the back of it, etc.
One lovely thing about the karada is it’s relatively beginner-friendly despite looking elaborate. It doesn’t involve any highly vulnerable areas (like joints) and distributes force widely. It’s also easy to adjust on the fly – you can always tug or loosen a section if needed. Just remember that as the rope bottom moves, the rope may shift and tighten a bit (especially that crotch rope portion – communicate about that to ensure it’s not uncomfortable on sensitive bits).
For variety, know that you can create different patterns with similar technique: for example, a ladder harness (straight ladder-like pattern instead of diamonds), or add extra twists to make more, smaller diamonds. But the classic diamond karada as described is a great starting point. It’s attractive, “a great anchor for additional layers and ties,” and truly makes the bound person look like they’re wearing a rope dress out of a fantasy.
Decorative Rope Bondage Patterns
Beyond the fundamental harnesses, Shibari offers endless possibilities for decorative patterns. This is where rope bondage becomes visual art. If you’ve ever seen photos of intricate rope designs on a model – maybe a star shape woven on someone’s chest, or an elaborate web encasing their body – those are decorative ties. They often have poetic names and are limited only by imagination. Let’s explore a few popular ones to spark your creativity:
-
Pentagram Harness (Star Harness): This eye-catching tie creates a five-pointed star pattern usually across the torso or back. One classic pentagram harness, for instance, is tied on the chest: ropes radiate in a star shape between the breasts and across the sternum. It’s purely decorative (it doesn’t restrain much), but it’s a must-know crowd-pleaser for Shibari enthusiasts – the bold symbol can feel empowering or cheekily “occult” in aesthetic. Typically, you’d tie a series of overlapping triangles and then symmetrically connect them to form the star. The pentagram harness is great for photoshoots or as a kinky outfit piece.
-
Rope Corset (Waist Cinch): Inspired by Victorian corsets, this tie laces rope around the waist, sometimes with a pretty X pattern down the front, literally mimicking a corset. It can be tightened to pull in the waist a bit (be cautious – like a real corset, don’t over-tighten and impede breathing or organ space). A rope corset is quite decorative and sensual, as it hugs the torso firmly. It’s often paired with other harnesses; for example, you might do a chest harness then add a rope corset below it on the same person. The lacing method usually involves threading the rope back and forth through vertical “ribs” of rope along the sides, exactly like lacing a shoe or corset. This tie is as much about the aesthetic of the criss-cross lacing as the mild squeeze it provides.
-
Hip Harnesses & “Skirts”: Rope isn’t just for the upper body – you can create harnesses on the hips and thighs that look like garters or skirts. A hip harness might wrap around the waist and upper thighs, with decorative weaves on the hips. Some ties, like the “butterfly hip harness” or “belted harness,” create a secure band around the waist (almost like a belt) and then loops around the thighs, connected by tensioned ropes that can even allow for lifting (some hip harnesses are used in partial suspensions). Decorative versions include adding weave patterns or attaching tassels of rope for a skirt-like effect. These are great for accentuating the buttocks and legs and can be functional (keeping legs together or apart) or purely ornamental.
-
Futomomo Variations: Earlier we’ll discuss the standard futomomo (leg fold tie) in the advanced section, but there are also decorative versions. For instance, a Pentagram Futomomo is a tie where after binding the leg, the rope is woven in a star pattern over the thigh and shin – adding visual flair to a functional leg tie. It’s a beautiful marriage of practicality and art: the leg is immobilized and prettily decorated.
-
Asymmetrical Artistry: Not all patterns have to be symmetric. Some Shibari artists do free-form, asymmetrical harnesses – say one arm and shoulder are intricately webbed in rope while the other side of the chest is left bare. Or a diagonal body harness that wraps from one shoulder to the opposite hip in a spiral. These ties often come from just improvising with rope once you know basic knots. For example, you might tie a “mermaid” leg tie: bind the legs together and then weave a decorative fish-tail pattern – named because it can resemble the scales on a mermaid’s tail. (One chest tie named the “Mermaid Harness” adds a mystical, wavy weave across the torso.) The idea is you can draw with rope on the body.
-
Adding Decorative Knots: Some special knots are used as decoration. For instance, the “flower” knot (aka Somerville butterfly) can be tied into a rope harness to create a flower-like embellishment on the body. Or the **“toggle” or “frog” knots can be placed strategically on pressure points to add a bit of stimulation and style. Even a simple overhand knot on two strands can look like a bead on the rope when repeated, which some riggers use to create patterns (like a line of “pearls” down someone’s back).
The key with decorative patterns is creativity and enjoyment. Let your artistic side play. You can incorporate things like weaves, braids, and hitches to create unique textures. For example, you could weave a second rope through an existing harness to create a two-tone lattice (if you have colored ropes, this looks fantastic). Or use a series of half-hitches to create a spiraling design (sometimes called a rope garter on the thighs). One tie humorously called the “candelabra harness” uses multiple weaving and hitching to produce a shape that apparently looks like a candle holder – the point is, anything you imagine, you can attempt to create with rope.
If this sounds complex, don’t worry – you don’t need to learn all these at once. Start simple: maybe try that pentagram harness or a basic rope corset. There are many tutorials and community resources for decorative ties once you’ve got basics down. And always keep function and safety in mind: even decorative ties shouldn’t be so tight they cause harm, and be mindful of nerve areas even when focused on looks.
Shibari’s artistic side is a big part of its appeal. It’s often said that tying someone is like sculpting – the rope is your medium, the body your canvas, and the end result a collaboration of art and trust. Have fun with it! Even if your pattern isn’t perfect, if you and your partner are enjoying the process, that’s what counts. Each time you practice, you’ll discover new twists (pun intended) to incorporate.
Next, we’ll move into some advanced Shibari techniques – these require more skill and care, but they’re often what people envision when they think of dramatic Shibari scenes (like suspensions!). Even if you’re just starting, it’s good to understand what’s possible and what additional learning and precautions are needed as you advance.
Advanced Shibari Techniques
You’ve got the foundation – now let’s peek at the more advanced side of Shibari. Advanced doesn’t necessarily mean you must try these right away (in fact, do not jump into advanced ties without plenty of practice and knowledge). But for a comprehensive tutorial, we’ll introduce them: suspension, futomomo ties, and hair ties. These techniques can be intense, highly rewarding, and beautiful, but they also come with greater risks and require a higher level of skill and caution. Approach them with respect, patience, and the mindset that you’ll continuously learn.
Introduction to Shibari Suspension
Suspension – hanging a person partially or fully in ropes off the ground – is perhaps the most awe-inspiring Shibari skill. There’s something breathtaking about seeing someone float in mid-air, bound in intricate rope, suspended as if time stopped. The suspended person might feel a mix of flying and floating, a deep surrender as gravity itself is harnessed as part of the scene. However, suspension is truly advanced. It introduces significant risks that are not present in floor work. If you’re a beginner or even intermediate, consider this an intro to what suspension is about, rather than a how-to for doing it immediately.
Safety and training are paramount here. As Shibari experts emphasize, suspension comes with inherent dangers: ropes that are perfectly comfortable on the ground can cause nerve damage once there’s body weight pulling on them, and a mistake in suspension could lead to falls and serious injury. Never attempt a full suspension without hands-on training from an experienced rigger. That said, it’s good to know the principles:
-
Types of suspension: There are partial suspensions, where one part of the body is lifted (e.g., chest harness attached overhead so the bottom is on tiptoe, or one leg is lifted off the floor), and full suspensions, where the person is completely off the ground supported by ropes. Partials are less risky and often a stepping stone – they let the bottom feel some weightlessness and let the top practice handling load, but the bottom can still support themselves a bit or be easily stood up if needed. Full suspensions are high-risk and require flawless technique.
-
Rigging points: You need a solid anchor point (often a metal suspension ring or strong beam) that can support at least 5–10 times the person’s weight (for safety margin). Often multiple ropes (called uplines) are attached from the person’s harnesses to the ring. Carabiners or rings are used to reduce friction. All hardware must be load-rated (climbing grade gear). Never improvise with something that might break – no flimsy ceiling hooks not meant for human load!
-
Body harnesses for suspension: Typically, a combination of harnesses is used – for instance, a secure chest harness (like a Takate Kote or similar) and a hip or leg harness. The person might be suspended horizontally (lying face-up or face-down in air), vertically, upside-down, or in a seated position. Each configuration has specific tie placements to distribute weight. For example, a face-down (prone) suspension usually uses a chest harness and a hip harness, plus support on the legs, so the rope’s bearing the load at the torso and hips, not just one point.
-
Nerves and circulation: When suspending, rope pressure intensifies. A wrap that was merely snug on the ground becomes a tourniquet under full weight. This can cause numbness or nerve injury quickly. Common danger spots: upper arms (radial nerve), thighs (femoral nerve), and any rope behind the neck. Rigorous attention to how rope is placed and continuous monitoring are necessary. Know your partner’s body: some people have higher risk of compression injuries. If in doubt, don’t load it. A good rigger will have studied anatomy – for suspension, you really need to know where the major nerves run and avoid those areas or tie in a way that spreads load.
-
Communication and consent: Before doing suspension, discuss thoroughly. Both partners must be clear on signals (often the person being tied might go non-verbal, so establish nonverbal cues like dropping a ball or blinking, etc.). Trust is huge here – the bottom literally entrusts their body to the top’s ropes. As the top, you must be prepared to immediately bring someone down if they indicate distress. And bottoms: communicate early! Don’t “tough it out” in silence – a tingle or loss of feeling is a red flag to voice right away. Agree on a safeword or gesture that, when used, means “down now.” Suspension isn’t a place to push past true limits; it’s intense enough even when all is well.
-
Always have safety measures: Spotter: It’s highly recommended to have a third person present as a spotter when doing suspension, especially while you’re new. They can observe things you might miss and assist in emergencies. Safety shears: Absolutely have cutting tools on hand (more than one, ideally). In case of any issue, cutting the rope is always an option to get someone down fast – rope is replaceable; a person’s health is not. Mats or padding: People can and do fall if something fails. A crash pad or thick gym mats under the suspension area can reduce injury if that happens. And of course, never leave a suspended person unattended even for a moment.
Reading this, you might think, “Wow, this sounds scary.” It is serious, yes – but when done right, suspension can be an absolutely exhilarating experience. Many describe it as a profound rush. The rope bottom might feel like they’re flying, completely helpless yet safe in the rigger’s ropes – a trust high unlike anything else. The rigger might feel a deep sense of responsibility, focus, and accomplishment, almost like conducting a scene that is part circus, part meditation. The visuals are stunning too: a body arched in midair, framed by ropes, evokes a blend of vulnerability and strength.
If you’re interested in suspension, take it step by step. Seek out workshops or mentors; learn on the ground extensively first. Practice all the components (knots, lock-offs, managing rope tension) with partial weight before going full. One wise approach: become very proficient at floor-based versions of the ties used in suspension (like chest harnesses, hip harnesses, futomomos) and at quick releases. Then practice partials – e.g., suspend just hips while upper body is still on ground (called a “progressive suspension”). Over time you’ll build the knowledge.
In summary, suspension is an advanced art within Shibari that should be approached with reverence and caution. As one guide put it, acknowledge “the inherent dangers” – nerve damage, falls, circulation issues – and prepare meticulously to mitigate them. Get proper training and never rush into it. When you do go up, double-check every knot and carabiner. Keep communication open. With these precautions, Shibari suspension can be an immensely rewarding pinnacle of rope play – an ultimate exercise in trust, technique, and intimacy literally elevated to new heights.
Futomomo Tie Instructions
The Futomomo is a favorite Shibari tie that we touched on earlier – it’s the one that binds a bent leg (thigh to calf). “Futomomo” basically means “fat leg” in Japanese, referring to the thigh. In practice, a futomomo tie takes a person’s leg, folds it so the heel is near the butt (knee bent), and then ropes it up tightly so it stays in that folded position. It’s often used in combination with other ties or in partial suspensions (imagine one leg tied in futomomo and attached upward, making the person stand on one leg). It’s also a versatile tie: you can do it on a standing person, seated, or lying down. It creates a lovely rope band down the leg, and can be very secure.
Let’s go through a basic futomomo tie step by step:
-
Start with a single column on the ankle and thigh: Get your partner in position – typically, the leg you’re tying will be bent, with the knee closed and the ankle up near the thigh (the classic is heel touching the buttock or close). If they can’t comfortably hold it that far, no problem; wherever their flexibility allows is fine. Now, take a rope (maybe 15-20 feet length) and tie a single column tie around both the ankle and the thigh together. Essentially, you treat the ankle and thigh as the “two parts” of one column. Wrap the rope two or three times around the thigh and the lower leg just above the ankle, cinching them together like a cuff, then tie it off like a normal single-column knot. This initial tie secures the leg in a bended loop. It should be placed a bit above the actual ankle bone (to avoid too much pressure on the bone) and on the meat of the calf against the thigh. Make sure that initial single-column is snug. If it’s loose, the whole futomomo can slip.
-
Spiral up the leg: With the ankle and thigh now connected by that column tie, you’ll use the remaining rope to wrap around the entire folded leg, winding upward. Take the two free ends of your rope and begin wrapping them around the calf and thigh together, moving upward toward the knee in a spiral fashion. Lay each wrap neatly next to the previous one (avoid gaps or overlaps) for a comfortable even pressure. The wraps should have a decent tension – firm enough to hold the leg, but not so tight as to cause pain or circulation cut-off. Depending on rope length and leg length, you might get 2-4 wraps; e.g., three wraps is common. Aim to finish your wrapping just below the knee (you generally don’t rope over the knee cap for a futomomo, to let the knee move a bit and not strain it).
-
The inside cinch (uchi-sabaki): Now you have a leg wrapped up but those wraps could slide without a cinch. So, we’ll lock them with a hitch on the inside of the leg (inside meaning the side of the calf that’s against the thigh). Take your rope ends and pass them over the top of the last wrap and between the thigh and calf on the inside of the bent leg. Essentially you’re threading the rope through that “triangle” of space at the knee pit from the inside. This creates a loop around the wraps. Now form a half-hitch: after going through, hook the rope under the segment you just created and pull through a loop, like you’re tying a overhand knot around the wraps. Pull it tight. This cinches all the wraps together on the inside of the leg – you’ll see it make a snug X pattern there.
-
The outside cinch: Repeat a similar cinch on the outside of the leg. After the inside cinch, bring your rope ends around to the outside of the leg (the outer side of the thigh). You’re likely now going upward along the leg. Create another hitch: bring the rope over the top wrap, then down between the thigh and calf on the outside, and loop it such that you again tie a half-hitch around the wraps, but in the opposite direction (since your working ends are traveling upward now). Tighten this as well. Now the wraps are cinched on both sides, which really firms up the futomomo structure – the ropes won’t slip off the leg easily because they’re tied in place at both the inner knee and outer knee sides.
-
Work your way along (if needed): With a long rope, you might alternate these inside/outside hitches on each wrap layer. Essentially, you can do a knot on the inside at each gap between wraps, and one on the outside at each gap, zig-zagging the rope ends along. In our description we did one inside and one outside which often suffices. If you had more wraps or rope left, you could continue: inside loop, outside loop, etc., until you reach the top wrap.
-
Finish the tie: Once you reach the top of your wraps (near the knee), you need to tie off the rope. A common way: feed the rope under the topmost wrap and then tie a square knot or a couple of half hitches around a section of rope to secure. Autostraddle’s method has you bring the rope ends through the last loop to reverse direction and then maybe wrap down a bit. But a simple approach: after your last hitch, if there’s a bit of rope left, you can wrap it around the whole bundle (around thigh and calf) a few times and then tuck the end under a wrap to hold, or tie an overhand knot on a piece of rope. Just ensure it’s fixed and won’t loosen. Tuck any tails.
Now you have a futomomo! The leg should be nicely bound – it’s effectively immobilized in that bent position. Test by gently jostling the wraps; if they stay in place, good. If the ankle slips or there’s gapping, you might need to re-tie tighter. Properly done, a futomomo is very secure and won’t unravel even if the person squirms.
What does it feel like? For the one tied, a futomomo creates intense pressure on the thigh and calf – it’s a bit like a tight leg hug. It can become uncomfortable if left too long, because muscles might cramp or circulation could get limited in the lower leg. So always check the foot of the tied leg – if it’s getting cold or blue, time to untie soon. Often rope bottoms describe a love-hate with futomomos: it’s restrictive in a hot way and can be sustainably uncomfortable (some like the challenge of enduring it). In partial suspension, a futomomo on one leg can create a predicament – the person has to balance on one foot, adding an endurance aspect.
From a top’s perspective, futomomo ties are super useful. They shorten a person’s height (if you tie both legs futomomo, they basically can’t stand, they kneel). They present the thigh (for impact play or other things). They can be hitched up to all kinds of stuff: you could attach a rope from the futomomo to a chest harness or a ceiling point to lift that leg, etc. Also, visually, futomomos with their rope spiral look great.
One caution: futomomo ties put pressure on the ankle and shin nerves if not padded by muscle. Ensure your initial wraps were on a fleshy part and not directly cinching the ankle bone or fibula head at the knee. If your bottom experiences any sharp tingles in the foot or toes going numb, that’s a sign to loosen or come out.
Practice futomomo on the ground plenty. It’s a staple of advanced bondage because of how it can be combined with suspension (for example, a “side suspension” might use one futomomo and one free leg, etc.). But even as a standalone, it’s a sexy tie – picture your partner on their back, legs in futomomos, arms perhaps tied behind – a very helpless, exposed position for… whatever you fancy 😉.
Hair Rope Tie Methods
For a sensual twist (pun intended) on bondage, don’t forget you can tie hair too! A hair rope tie is a technique where you use rope to bind someone’s hair, usually to create a sort of handle or tether using their ponytail or braid. It’s an intimate form of control – the head is very sensitive, and a gentle tug on a rope-attached ponytail can send shivers down the spine. It’s also visually striking: long hair braided with rope, or a rope leash leading from someone’s hair, has a dramatic effect.
However, hair ties need to be done carefully to avoid damaging the hair or causing too much pain. The goal is to pull the hair evenly and not rip out strands. Here are a couple of methods and tips for tying hair:
-
Ponytail Lark’s Head Tie: This is one of the simplest and most secure hair ties. Gather your partner’s hair into a ponytail (it works best if the hair is medium to long length). You can use a normal hair elastic to make a ponytail first if you like. Then take a rope (something thin like 4mm or 6mm works well, and ideally a soft rope to avoid cutting hair – hemp/jute can grip well but some prefer softer). Fold the rope in half to find the midpoint. Now, place that midpoint under the base of the ponytail, and fold it over so you create a loop around the hair – basically a lark’s head knot on the ponytail. Pull the two free ends of rope through the loop and tighten it down at the base of the ponytail. You’ve now tied the rope to the hair. It should be snug, but not so tight it’s snapping hairs. This collapsed lark’s head method is great because it cinches evenly around the bundle of hair, distributing pressure on all strands equally (thus minimizing damage). Important: as you tighten, do so gradually and hold the ponytail below the tie to keep tension even. You don’t want just a few hairs taking all the force. When done, the rope should hold firm on the hair like a new “hair tie” and not slip off.
-
Securing the hair tie: Once the rope is attached to the hair, typically you’ll tie a small knot to keep it from loosening. For example, after making the lark’s head, you can tie a half hitch or two with the working ends around the hair just below the lark’s head. Often though, simply pulling the lark’s head super tight and maybe twisting it once is enough if you’re going to maintain tension. Some advanced methods use additional half-hitches down the ponytail to really secure (and add decorative knots along the hair).
-
Using the hair tie: Now you effectively have a rope “leash” attached to their hair. You can use it in many ways. A common scenario is to gently tug the rope to control the person’s head position – e.g., pulling it back to arch their head, or leading them by the hair. Because the rope distributes pressure, it’s safer and more comfortable than grabbing a handful of hair with your hand (which can concentrate force on a few strands). You could also tie the rope ends off to something else: for instance, tie the hair to your partner’s own wrist bindings (forcing their head back if they try to move their arms) – a devious predicament! Or tie the hair rope up to a headboard, effectively tethering them by the hair to the bed. Another visually stunning use is tying the hair rope up to a ceiling ring along with other suspension lines – not to bear full weight (never suspend solely from hair tie!), but to keep the head upright or pulled in a certain angle during a suspension. Never put full body weight on a hair tie – it’s not meant to suspend a person (scalp can’t handle that). But hair can handle quite a bit of controlled tension.
-
Even tension is key: The most important factor for a successful hair tie is keeping the tension even across all hairs so you don’t have a few hairs taking the brunt and ripping out. Use rope that has good grip but is smooth. Surprisingly, a slightly rough rope like a supple jute or hemp works well because it grips the hair and doesn’t slide, as long as it’s flexible enough to cinch down evenly. Avoid very stiff or very slick ropes (a stiff rope might not cinch evenly; a slick nylon might slip and then yank out hair suddenly). Cotton can be okay too, being soft and somewhat grippy when tensioned. Some riggers even wet the rope slightly for extra grip (but that can tighten unpredictably as it dries, so be cautious).
-
Alternate methods: If the lark’s head method is tricky or if hair is extremely long, another method is to braid the rope into the hair. For example, take a strand of rope as one of the “sections” of a braid and braid it together with the hair, then tie the rope off at the end of the braid. This produces a cool effect – a rope-braid – which can then be used like a handle. It’s gentler in some ways (spreads tension along the length of hair) but requires patience to braid. Another approach: if the hair is short but enough to gather a bit, you can use a thin cord and literally tie a series of overhand knots around the bundle of hair from base upward (almost like making a rope “grip” on the hair).
-
Experience and caution: The scalp is sensitive. Some people love hair pulling – it releases endorphins and feels erotic or subby. Others find it too painful. So gauge your partner’s preference. Start with light tension. A good hair tie, properly done, will hold even with firm pulling, but you can still modulate force. The feeling of being “leashed” by the hair can be psychologically intense – many find it hot and submissive. It has a primal vibe (“I literally have you by the hair”).
One more playful idea: a hair tie predicament – tie the hair rope to, say, an ankle rope, so if the person lowers their leg, it pulls their hair. This kind of predicament ensures they keep posture to avoid tugging their own hair – quite devious and requires flexibility!
To put it in perspective of our earlier topics, hair ties fall under decorative/psychological more than restraint (you’re not immobilizing limbs, but controlling posture). Done right, a rope hair tie “pulls the hair evenly with minimal damage” while still being extremely secure – meaning you can trust it for play without fear of random clumps being torn out. Always check after – make sure you’re not inadvertently yanking too hard. And do not tie someone’s hair and then forget about it while moving them around; sudden movements can cause an ouch moment.
Lastly, if your partner has very short hair, you might not be able to do a traditional hair tie. Instead, consider a head harness – rope that goes around the head itself (like a rope halter) – but that’s a different technique. Or use a leather head harness or a bonnet to attach rope to. But if there’s at least a small ponytail possible, the lark’s head tie can work even on shoulder-length hair (you gather as much as you can).
Hair bondage is a beautiful mix of sensual and psychological play. It often evokes a gasp when the rope is tugged and the head moves. Just think of it as an extension of classic hair-pulling, done with finesse via rope. As with all, go slow, communicate, and soon you’ll master this elegant technique.
With advanced ties like these – suspension, futomomo, hair ties – you can see Shibari can get quite elaborate. It’s a journey; there is always more to learn. Take your time, never stop educating yourself on safety, and enjoy the process. Even advanced riggers will tell you they’re constantly refining their technique. That’s part of the appeal: Shibari is an endless learning experience, and each scene teaches you something new about ropes, your partner, and yourself.
Choosing and Caring for Shibari Rope
Rope is your primary tool in Shibari, so picking the right kind and keeping it in good condition is important. When you’re starting out, the sheer variety of ropes can be confusing – jute, hemp, cotton, nylon, silk, coconut (ouch!), bamboo, etc. Each has pros and cons. We’ll focus on the most common for bondage: jute, hemp, and cotton, with mentions of others. Also, once you invest in good rope, you’ll want to care for it (especially natural fibers) so they stay supple and safe. Let’s break it down:
Jute vs Hemp Rope Comparison
Natural fiber ropes are the traditional choice in Shibari – especially jute and hemp. They have that classic look (golden-brown color), a bit of rustic smell, and a tooth (bite) that holds knots well. But which to choose?
-
Jute Rope: This is the iconic Shibari rope. In Japan, jute is highly favored. It’s a light-weight fiber, which means jute rope is about half the weight of an equivalent hemp rope. Why does weight matter? A lighter rope is easier to throw around the body and less tiring to handle in long sessions. Jute has no stretch – when you pull it, it doesn’t elasticate, which is ideal for predictable tension in bondage. It has excellent “tooth”, meaning the texture causes friction that helps knots and frictions lock in place securely. Jute is known for moving quickly and smoothly during tying – it often feeds out fast, great for dynamic scenes.
However, jute is a bit rougher in texture. Even when well-conditioned, it tends to stay slightly scratchy and can leave rope marks on the skin (some love those tiger-stripe rope marks as a badge of fun). If someone has very sensitive skin, jute’s fibers might be prickly or cause mild irritation. Also, jute is less strong and less durable than hemp. In terms of tensile strength, it’s roughly half as strong as hemp rope of the same diameter. That means for suspension or heavy load, you need to be more careful (using thicker jute or replacing rope regularly). And jute ropes wear out faster – with regular weekly use, a jute rope might last ~1 year before it’s too frayed or weakened. It’s somewhat disposable in that sense (which is one reason Japanese dojos often go through rope batches and why conditioning is key to extend life). The upside is jute is usually relatively inexpensive, and because it’s traditional, you can find high-quality jute made for Shibari from various suppliers.
Jute rope often has a distinct scent (some say like burlap or grass). High-end jute may have been treated to remove oils and such, so it can even squeak when new. Once broken in, it becomes soft and supple, but always a tad coarse to the touch. Many riggers adore that feel – it’s part of the aesthetic. Jute’s light weight also means tying big harnesses is easier on your wrists, and if a coil of rope swings and hits someone, it’s less thud than a heavy hemp coil. Traditional jute typically comes in ~6mm diameter for Shibari, with 3 or 4 strand lays.
-
Hemp Rope: Hemp is another natural fiber that’s popular, especially in the West. It shares a lot with jute: low stretch, good knot-holding. The differences: hemp is heavier and a bit stronger. A good hemp rope can last a long time – some say “hemp lasts forever” (slight exaggeration, but it does endure well with care). Hemp fibers are a bit oilier and often the rope is conditioned with treatments, so it typically feels softer on the skin than jute from the get-go. Over time, hemp ropes become very soft and smooth with use – they can develop a almost silky touch, which some rope bottoms enjoy on their skin. Hemp has a bit of “stretch” – not elasticity per se, but it can have a tiny bit of give under heavy load. That means in a suspension, a hemp rope might elongate a tad, whereas jute basically doesn’t. This can be good or bad: a little give can be forgiving under sudden load, but it also means knots might need retightening.
Hemp is stronger than jute (roughly twice as strong of similar size), giving a safety margin for suspensions. It also doesn’t shed as quickly; a well-treated hemp rope can handle a lot of tying, including floor work and some rough handling, without breaking. People also like that hemp is washable (gently, and re-oiled after) whereas jute is usually not washed because it would strip oils and weaken it.
The downsides: hemp is heavier, so a bundle of hemp ropes in your bag is noticeably weighty, and throwing a hemp rope for a wrap requires a bit more oomph. The heaviness also means if a coil swings into skin it can sting more. Hemp can also be slightly more expensive (depending on source). And because hemp gets very soft, it can sometimes have a bit less “bite” in certain knots – though in practice well-laid hemp holds knots excellently, almost as good as jute. Hemp often has a earthy smell, sometimes a bit like hay or grass, which most find pleasant but it’s distinct from jute’s odor. Visually they look similar (hemp maybe a shade darker). Some riggers start with hemp for its forgiving nature and later move to jute for performance once they like faster tying. Others stick with hemp for its comfort and durability.
In summary, if we compare:
Jute – traditional, very light, no-stretch, great friction, a bit scratchy, shorter lifespan.
Hemp – strong, becomes super soft, lasts long, has a bit more weight and slight stretch, handles a tad slower.
A pithy comparison from one rope maker: “Hemp is strong, soft, lasts forever; Jute moves fast, has unrivaled bite, but needs more care and replacement”. Many people love both – you might get a couple of each and see what you prefer.
One more point: both jute and hemp are natural and biodegradable. They require conditioning (more on that soon). They can shed little fibers (especially jute) – so you’ll get “rope fuzz” on dark clothes sometimes. That’s normal. Also note, natural fiber ropes must be regularly inspected for wear – if you see fraying or thinning, or if a rope took a heavy load like a big drop or shock, consider retiring it or cutting off the damaged section.
Cotton Rope Bondage Benefits
Cotton rope is often recommended for beginners, and for good reason. It’s widely available (you can find cotton rope in hardware or craft stores easily), cheap, and super soft. Think of that thick, fluffy rope that might be used as a clothesline or a decorative rope – that’s cotton.
What makes cotton appealing for bondage? For one, it’s very gentle on the skin. It’s unlikely to cause rope burn or abrasions except under extreme friction (you’d have to really yank it quickly to burn, and even then cotton tends to be kind). This forgiving nature is great when you’re learning, because newbies sometimes accidentally drag rope too fast or over sensitive areas; cotton is more forgiving of those errors. It also tends to hold moisture a bit, meaning if you sweat or there are, ahem, bodily fluids, cotton won’t degrade from it quickly and is easy to wash – just mild soap and water, then air dry (though repeated washing can stiffen or shrink it a bit).
Cotton is also hypoallergenic for most – no natural oils or all that like jute/hemp might have, so if someone has allergies, cotton is safe. And being a common material, it’s inexpensive – you can buy lots of it without breaking the bank. That means you won’t feel “precious” about it; if you need to cut it in an emergency, you won’t hesitate (versus someone with a $50 treated jute rope might think twice… though safety first, always cut if needed!). As Midori wittily points out, “Cotton is nice for a budget: because it’s cheap, you can buy a lot and use it without feeling precious or overly delicate about it. It feels easier to shorten it or cut in case of emergency. I want people to get playing, not stressing.”. That captures it well – cotton lowers the intimidation factor.
Cotton rope is usually a bit stretchy and bouncy. This is a double-edged sword. The stretch means it’s not suitable for suspension or any scenario where rope stability is critical. Under tension, cotton can elongate and also can compress down (since it’s often a braided construction rather than a laid rope, it can collapse diameter under load). This means knots might tighten extremely hard (hard to untie later) or slip if the rope’s really soft. So for complex Shibari ties that rely on friction locks, cotton sometimes doesn’t “bite” as well – a knot you tie might loosen after some squirming because the cotton’s so silky. That’s why for serious tying, especially anything load-bearing, avoid cotton. But for simpler bedroom bondage (wrists, ankles, decorative harness), it’s absolutely fine and very comfortable.
Another benefit: cotton rope often comes in fun colors (it dyes easily). So you can have pink, red, black, you name it – which can add a fun visual element. Also, many beginner bondage kits use cotton because it’s seen as non-threatening and easy to handle. It usually has a braided or twisted construction that’s not too rigid.
One thing: because cotton fibers are short, a cotton rope under strain can fuzz and eventually tear over time, especially at knot points. Always check your cotton rope for any thinning or worn spots if you reuse it often. But since it’s cheap, replacing it is no big deal.
To recap the benefits of cotton rope: It’s soft on the skin, holds knots fairly well, unlikely to cause allergic reaction or rope burn, washable, and inexpensive. It’s a great pick for nervous tops or rope newcomers who want to focus on technique without worrying about rope maintenance or scratching their partner. It’s the training wheels of rope, but also something you might keep using for certain scenes where comfort is key (like tying a rope corset on someone under their outfit for hours – cotton might be best then).
Just heed the main caveat: cotton’s stretchiness and lower strength means no suspension or critical weight-bearing ties. Save those for jute/hemp or synthetic lines designed for it. Cotton is perfect for playful, on-the-bed restraint and decorative ties for photos, etc. As one guide put it: “Cotton is familiar, soft, and stretchy, making it ideal for lighter, beginner-level shibari… just avoid using it for suspension.”.
How to Condition Jute Rope
If you decide to go with natural fiber ropes like jute (or hemp), you’ll hear about rope conditioning. This is basically the process of taking raw rope (which can be stiff, overly fibrous, and sometimes treated with machine oils) and turning it into that buttery-smooth, ready-for-skin rope that glides nicely and doesn’t shed too much. Properly conditioned rope not only feels better, it’s also safer (less likely to cause splinters or have weak spots) and stronger (because the fibers are aligned and lubricated).
Conditioning jute rope can be a bit of a project, but many riggers find almost Zen pleasure in it – it’s caring for your tool. There are different methods, but I’ll outline a common approach that yields good results. (If you buy “premium” bondage rope, sometimes it’s pre-conditioned; if not, here’s what to do.)
Goal: Reduce the rough fuzzy hairs and stiffness in the rope, infuse it with oils to make it supple, and smooth it out into "soft and supple beauties" ready for play.
Method (Quick version):
-
Cut and finish ends: If you have a long spool of jute, cut it to your desired lengths (usually 8m or ~26ft is standard Shibari length, some prefer 7m or 30ft – up to you). Once cut, tie off the ends of each rope to prevent unravelling. You can overhand knot the ends or whip them with thread, or wrap in tape temporarily.
-
Initial tumble (dry): Put the rope coils (a few at a time) in a tumble dryer on NO heat (air fluff setting). Tumble for about 20-30 minutes. This mechanical agitation breaks in the fibers, shakes out excess debris, and softens the rope quickly. Check the dryer's lint trap – you'll likely find lots of fuzzy bits collected; clean it out mid-way if needed. (If you don't have a dryer, some people hand-abuse the rope by running it through a carabiner repeatedly or stepping on it over a sheet – but dryer is easier.)
-
Apply rope oil ("butter"): Rope "butter" is a mix of waxes and oils (often beeswax + jojoba or mineral oil) used to condition rope. You can buy or make it. Now, many do this step differently: some prefer to oil before tumbling, others after the first tumble. A quick method is to do a light oiling mid-tumble: pause the dryer after first 30min, add a small chunk of rope butter or a few drops of jojoba oil among the ropes, then tumble again another 30min. The warmth from friction helps the oils distribute. The rope will come out a bit oily/waxy – that's okay. Alternatively, you can take each rope and hand oil it: run the rope through a cloth with a dab of mineral or camellia oil, or through your hands with some rope butter, coating it evenly. Don't soak it, just a light coat.
-
Second tumble: After adding oil, tumble the ropes again for another cycle (~30 min, no heat). This further softens and now the oil penetrates fibers while the wax lightly polishes them. Remove and check – they should feel much softer, less fuzzy. Remove any big knots that might have formed in the dryer (ropes can tangle, be patient and untie them carefully).
-
Singe off fuzz: Despite tumbling, you'll see fine hairy fibers on the rope. To get that sleek finish, carefully use a gas flame to burn off the fuzz. A small camping stove or butane torch works; some use an alcohol burner. Run the rope quickly through the blue part of the flame (hottest, cleanest burn) a section at a time. Keep it moving – you're lightly singing off hairs, not charring the rope. You might see a quick flash as fuzz burns off. Be extremely cautious! Loose fibers can ignite; always keep the rope moving and away from big bundles of fuzz that could catch. Do this in a ventilated area (burnt fiber smell). Also don't burn one spot too long or you weaken that area.
-
Final wipe and rest: After singeing, take a clean cloth with a tiny bit of jojoba or mineral oil on it and run it along the rope to wipe off soot and give a final light lubrication. You'll see the cloth pick up some black from burnt fuzz – good, cleaning it off. Now coil your ropes and let them air out for 24 hours or more. This resting period lets any oil smell dissipate and the rope "settle". Spread them or hang them so they're not in a heap (they might feel a tad greasy initially; after a day they'll feel just right as they absorb the oil).
-
Ready to use: Once they don’t smell strongly and feel dry-to-touch (not leaving oil on your hand), they’re ready. The ropes should now be supple, with a nice light sheen, and much less shedding. You’ll notice they handle so much nicer than raw out-of-the-package. They may still have a bit of stiffness which will further ease with actual use (tying people will soften them more over time).
This is essentially what the Amatsunawa guide calls the quick method. There are more labor-intensive methods (like hand stretching, multiple dry cycles, etc.), but the above works well for most.
Remember a few don’ts: Don’t wet natural ropes unless you plan to tension-dry them – water can swell and disrupt fibers too much if not handled carefully. Don’t use vegetable oils (they go rancid); stick to mineral or specialized oils like camellia. Beeswax is great in small amounts to seal fibers.
After conditioning, during use, your ropes will still slowly fuzz up again. It’s normal to occasionally re-burn fuzz after many sessions and re-oil if they get dry. A well-kept jute rope might get a quick wipe of oil every few months to keep it happy.
Also, storage: Hang or coil loosely and keep in a dry place out of direct sunlight (UV can weaken fibers). Some coil ropes and store in a breathable bag. Avoid dampness (mildew risk).
With these ropes ready, you'll find tying is smoother and more predictable. The rope will "flow" through your hands nicely and tighten where you want without jerking. It truly makes a difference – handling a well-conditioned jute rope is a joy, whereas raw jute can be a scratchy fight. As the guide said, the aim is to "reduce the hairiness of jute ropes and turn them into soft and supple beauties" – mission accomplished!
In conclusion, learning Shibari is a journey of both technical skill and emotional connection. We covered a lot: from the rich history that underpins this art, to the basic knots like single and double column ties (your trusty building blocks), moving through creative harnesses that adorn the body in rope, and even stepping into advanced territory with suspensions and intricate ties. By now, you should have a good roadmap of what it takes to master Japanese rope bondage techniques at a beginner-to-intermediate level.
Always keep in mind the core values that make Shibari so special: consent, communication, trust, and care. The most beautiful tie isn’t about perfect symmetry or fancy knots – it’s the one done with mutual understanding and respect, where both people feel safe and connected. As you practice, you’ll find Shibari can be a form of conversation and even courtship between top and bottom. It’s sensual, and yes, can be intensely erotic, but it’s also about psychology and relationship – the rope merely facilitates what’s already there between you.
Approach Shibari with a sense of curiosity and play. It’s a way to keep seduction and mystery alive. One could imagine her saying: In rope, as in love, you must balance tension and slack. You tighten not to suffocate, but to cradle; you loosen not to abandon, but to allow breath. There’s a poetic dance in these ties – an intimacy that speaks without words.
So take your time with these tutorials. Enjoy the feeling of rope in your hands and on your skin. Laugh at the fumbles (we all tie ourselves in knots wrong at first!). Celebrate the little victories – that first time you do a single-column tie and it holds perfectly, or the first harness you complete and see your partner’s eyes light up at how it feels. Shibari is as much about the process as the result.
Be responsible: never stop learning (maybe attend a local rope jam or workshop if you can, the community can be wonderfully supportive), always prioritize safety (when in doubt, more communication and more safety shears!). With practice, what once seemed complex will become second nature. Your hands will develop muscle memory, your rope will develop character from use, and your confidence will grow.
Finally, remember that Shibari, at its heart, is a shared experience. Whether you’re tying or being tied, you are co-creating a space of trust and exploration. Be present with each other. A well-executed Shibari scene can feel like time standing still – it’s just the two of you and the subtle sound of rope sliding, knots securing, breath quickening. It can be intensely romantic, in its unique way.
So go forth and tie (or be tied) with love, creativity, and consensual passion. Respect the craft, enjoy the art, and most importantly – have fun with it. Because at the end of the day, those ropes are there to bring you closer, both physically and emotionally, forging “deep bonds between partners” through trust, communication, and a bit of adventurous play. Happy tying, and welcome to the beautiful world of Shibari!